Markdown Labels
Markdown Labels Setup and Use Guide
Before You Start
-
You need access to Back Office, System Parameters, Roles, Labels, and the Till.
-
The workflow uses Code128 barcode labels. In this example, the markdown barcode format is MD|ItemID|MarkdownPrice.
-
The example item has an original price of $18.00 and a $1.00 markdown, so the new sale price is $17.00.
1. Back Office Setup
Step 1: Enable Markdown Labels in System Parameters
Action: Go to Back Office > System Parameters > Customize, turn on Enable Markdown Labels, and save the change.
Result: The Markdown Labels option becomes available in Back Office, and the Till can accept markdown barcodes when they are scanned.
In the image:
-
Open the Customize tab inside System Parameters.
-
Turn on Enable Markdown Labels.
-
Click Save after enabling the setting.
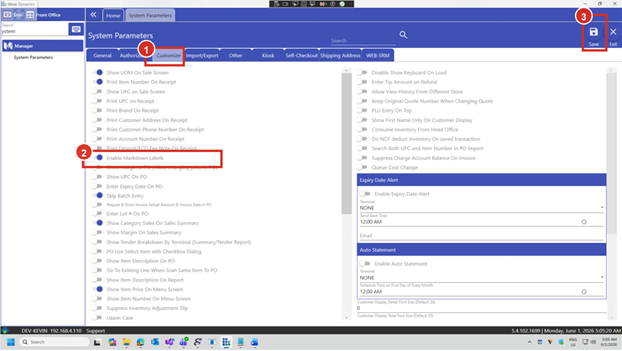
Figure 1 - System Parameters with Enable Markdown Labels highlighted.
Step 2: Confirm Role Permissions
Action: Open the role that will print labels. On the Labels tab, confirm that Labels Print has Grant enabled and Hide (BO Only) is not selected.
Why it matters: If the permission is hidden or not granted, users may not see or have access to the Print Markdown Labels options in the menu.
In the image:
-
Open the Labels permissions tab.
-
Find Labels Print in the permissions list.
-
Grant should be checked and Hide (BO Only) should stay unchecked.
-
Click Save to keep the role changes.
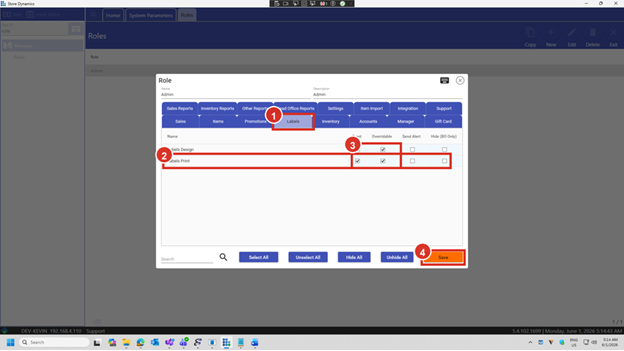
Figure 2 - Role permissions for label printing.
2. Label Template Design
Step 3: Open Design Labels
Action: In Back Office, open Labels > Design Labels. Select an existing Markdown label template or create a new one.
Tip: Use the existing Markdown Label row if it already matches the store label format. Otherwise, click New and create a template for markdown barcode labels.
In the image:
-
Use Labels > Design Labels in the Back Office menu.
-
Select an existing Markdown label template if one already exists.
-
Use New to create a new design when needed.
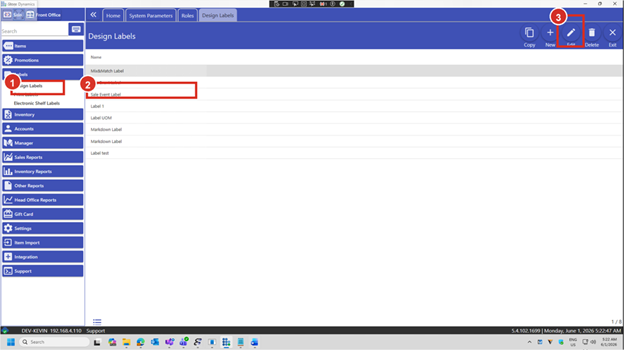
Figure 3 - Design Labels list and New button.
Step 4: Add the Required Label Fields
Action: Create or edit the label and use Code128 as the barcode type. Add Price, SalePrice, and Code128 to the label design, then save the template.
Field meaning: Price is the original item price. SalePrice is the price after the markdown is applied. Code128 is the barcode value used by the Till.
Important: Use Code128 for these markdown labels. Other barcode types may not appear correctly in the Markdown Labels setup screen.
In the image:
-
Set the barcode type to Code128.
-
Place the key fields on the label: Price, SalePrice, and Code128.
-
Review the label properties such as size, columns, rows, and margins.
-
Preview or Save the label when the design is ready.
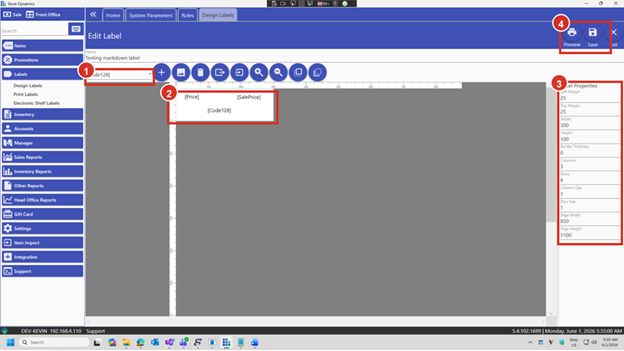
Figure 4 - Edit Label screen with Code128 and required fields highlighted.
3. Create and Print Markdown Labels
Step 5: Open the Markdown Labels Screen
Action: Open Labels > Markdown Labels. Use the search box to find the item by name, UPC, or item number.
Screen layout: The item lookup area is on the left. The selected item and markdown entry fields are on the right.
In the image:
-
Open Labels > Markdown Labels.
-
Search for the item by name, UPC, or item number.
-
Use the Markdown Entry panel to choose the template and discount.
-
Use Preview or Print after the entry is complete.
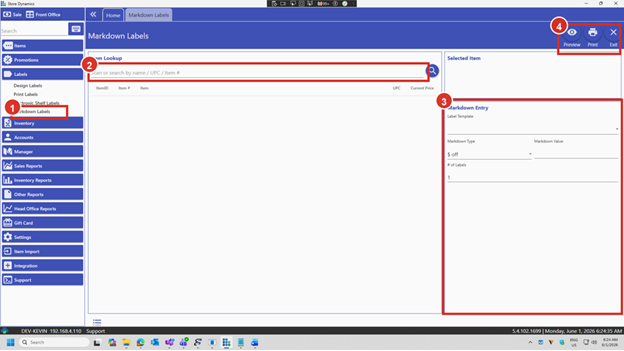
Figure 5 - Markdown Labels screen layout.
Step 6: Select the Item and Enter the Markdown
Action: Search for the item, select it from the results, choose the label template, choose the markdown type, and enter the markdown value.
Example: The item price is $18.00. A $1.00 markdown changes the sale price to $17.00.
Barcode format: The barcode is MD|ItemID|MarkdownPrice. In the example, MD means markdown, ItemID identifies the product, and MarkdownPrice is the final discounted price.
In the image:
-
Search for the item.
-
Select the item from the result row.
-
Confirm the selected item details on the right.
-
Choose the label template, markdown type, and markdown value.
-
Check the calculated original price, discount, new price, and barcode.
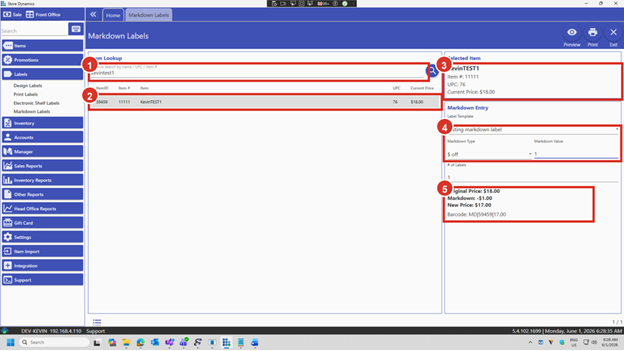
Figure 6 - Item selection and markdown entry fields.
Step 7: Enter the Number of Labels
Action: Enter the number of labels to print. In this example, the number of labels is changed to 8.
Check before printing: Confirm that the original price, markdown, new price, and barcode still match the intended label before using Preview or Print.
In the image:
-
Enter the number of labels to print.
-
Preview lets you review the sheet; Print sends it directly after the popup.
-
Verify that the new price and barcode still look correct before printing.
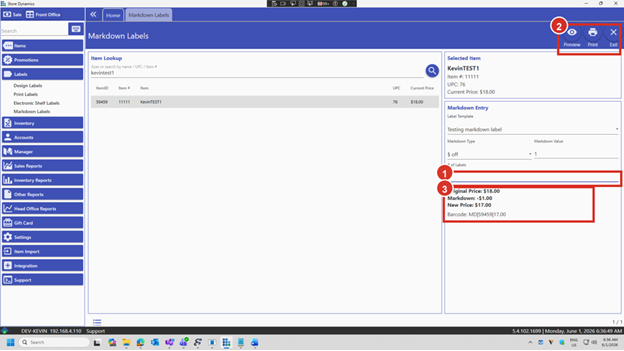
Figure 7 - Number of labels and Preview/Print buttons.
Step 8: Choose the Start Position and Printer
Action: After clicking Preview or Print, enter the starting row and starting column. Then choose the printer. For testing, Microsoft Print to PDF can be used.
Why it matters: The start row and column tell the system where to begin printing on the label sheet, which is useful when part of the sheet has already been used.
In the image:
-
The Print Label popup opens after Preview or Print.
-
Enter the starting row and starting column for the label sheet.
-
Select the label printer or Microsoft Print to PDF for testing.
-
Click Print to generate the output.
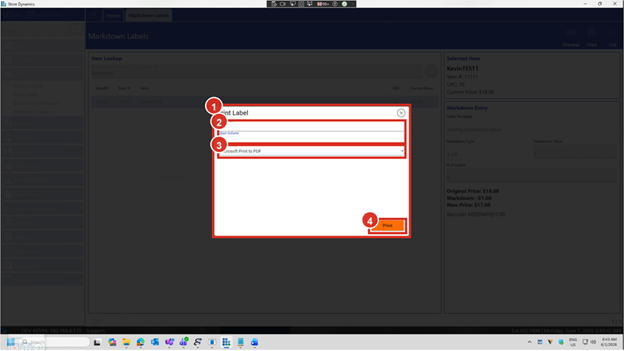
Figure 8 - Print Label popup.
Step 9: Review the Preview
Action: Use Preview to confirm the labels are positioned correctly before printing. If the preview looks correct, print from the preview screen.
Expected result: The preview shows the original price, the markdown sale price, and the barcode value on each label.
In the image:
-
The white page is the label sheet preview. Confirm the labels start in the expected position.
-
The visible labels show the original price, markdown sale price, and barcode placement.
-
Use the Print button in the preview if the layout is correct.
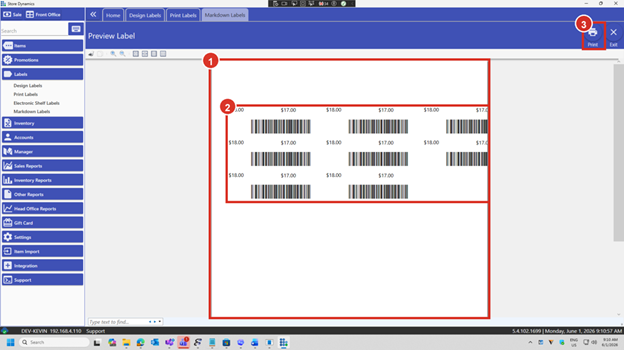
Figure 9 - Preview Label screen.
Step 10: Print Directly When Ready
Action: Use Print from the Markdown Labels screen when you do not need to review the preview first. The same printer popup appears, and the labels print after you confirm it.
Difference from Preview: Preview lets you inspect the sheet first. Print sends the labels directly after the popup is completed.
In the image:
-
Preview opens the layout review screen.
-
Print opens the same printer popup and then prints directly.
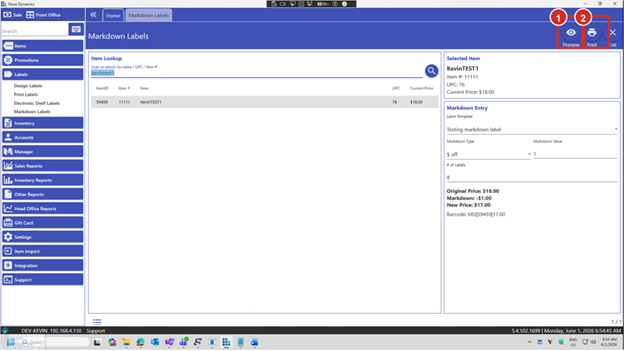
Figure 10 - Preview and Print buttons on the Markdown Labels screen.
4. Till Validation
Step 11: Confirm the Disabled-Setting Warning
Behavior: If Enable Markdown Labels is disabled in System Parameters, the Till rejects the scanned markdown barcode and shows Markdown label is not allowed.
Fix: Return to System Parameters > Customize, enable Markdown Labels, save, and test the scan again.
In the image:
-
This popup appears when the Till scans a markdown label while the system parameter is disabled.
-
The message confirms that Markdown labels are not currently allowed.
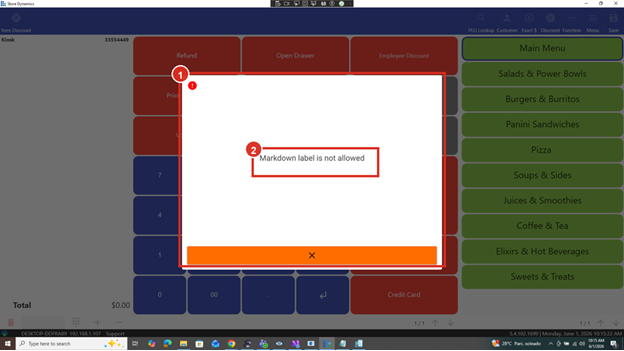
Figure 11 - Till warning when Markdown Labels are disabled.
Step 12: Scan One Markdown Label
Behavior: When the setting is enabled, scanning the markdown barcode adds the item to the sale at the discounted price.
Example: The original price is $18.00, the markdown is $1.00, and the Till total becomes $17.00 for one item.
In the image:
-
The scanned item appears with the markdown price.
-
Total Savings shows the markdown discount applied to the sale.
-
The total reflects the discounted sale price.
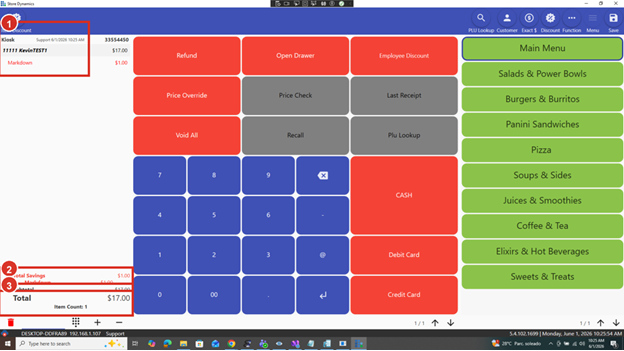
Figure 12 - Till sale with one markdown item.
Step 13: Confirm Quantity Behavior
Behavior: The markdown is applied to each unit. If the quantity is 2 and each item has a $1.00 markdown, the total markdown is $2.00.
Example: Two items at the $17.00 markdown price total $34.00, and Total Savings shows $2.00.
In the image:
-
The item quantity is now 2.
-
The markdown savings are doubled because the $1 discount applies to each item.
-
The total updates to the two discounted items.
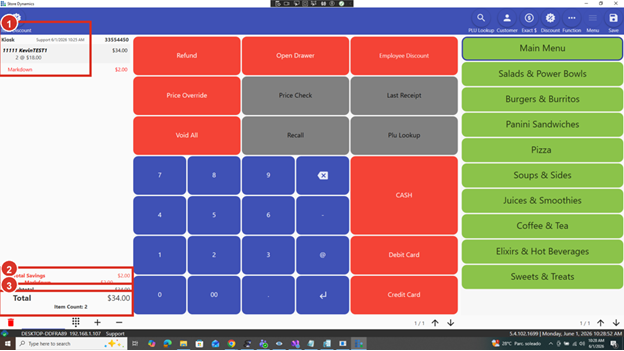
Figure 13 - Quantity 2 doubles the markdown savings.
5. Refund Mode
Step 14: Enter Refund Mode
Action: From the Till, open Function and select Refund. The Till changes into refund mode.
Reminder: Refund mode should be used only when the transaction is intended to return the item to the customer account or cash/card flow according to store policy.
In the image:
-
Open the Function menu from the top bar.
-
Select Refund to enter refund mode.
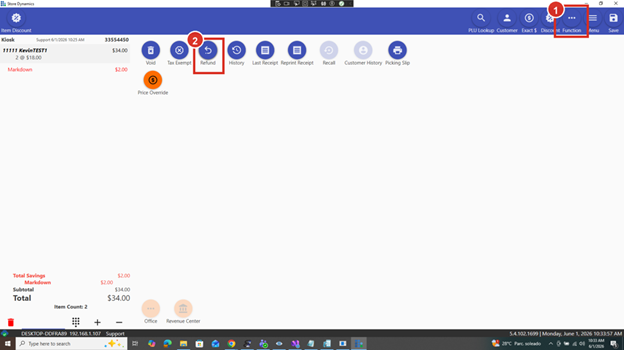
Figure 14 - Function menu with Refund highlighted.
Step 15: Scan One Markdown Label in Refund Mode
Behavior: When the markdown barcode is scanned in refund mode, the refund uses the discounted markdown price, not the original price.
Example: One refunded item returns $17.00 because the label price after markdown is $17.00.
In the image:
-
The orange banner confirms Refund Mode is active.
-
The refunded item is listed at the markdown price.
-
The total refund is based on the discounted price.
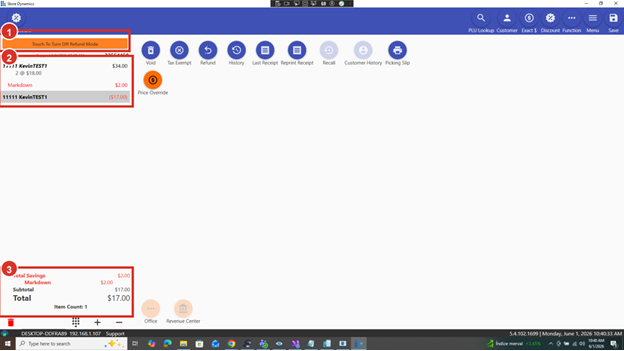
Figure 15 - Refund mode with one markdown item.
Step 16: Confirm Multi-Item Refund Totals
Behavior: Refund quantity multiplies the markdown price the same way sale quantity does.
Example: A quantity of -2 at $17.00 each creates a refund total of -$34.00.
In the image:
-
The line shows a quantity of -2 at the discounted price.
-
The total refund is -$34.00 because two items are refunded at $17.00 each.
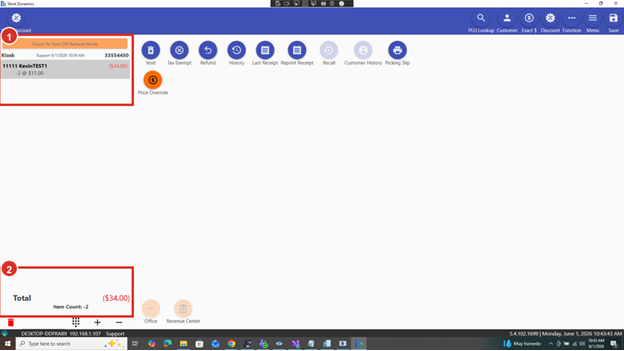
Figure 16 - Refund mode with two markdown items.
Quick Checklist
-
Enable Markdown Labels in System Parameters > Customize and save.
-
Confirm the user role has Labels Print granted and is not hidden from Back Office.
-
Create a Code128 label template with Price, SalePrice, and Code128 fields.
-
Use Labels > Markdown Labels to select the item, template, markdown type, value, and number of labels.
-
Preview the sheet before printing when you need to confirm label placement.
-
Test the printed barcode in the Till and confirm the discounted price, quantity behavior, and refund behavior.
Tag: